Infolinks In Text Ads

Sunday, 4 May 2014

Easy Double polka dots Nail Art


Hello my dear Girls!! Sorry I could not post all these days :(
Been a bit busy... So I am back with a bang... Here's a simple and easy nail art which can be done in no time, even at the last minute. It can be done with no extra tools!! That really sounds soooo good, isn't it?? :)
I love polka dots, so I get most of the ideas on it.. Here you go..

You will need:

  • A normal nail paint, I have used blue color.
  • A glitter nail polish, I have used pink glitter nail paint.
  • A white color nail polish, or you can use your own favorite color combinations.
  • A transparent nail polish.


Procedure:

  • Start with a base color, where I used Blue nail paint.
  • It takes a few minutes to dry.
  • Once the paint is dry, just use the brush of a white nail polish, which is fully dipped in the white nail color, and place it vertically on the nail, so that you get a perfectly round polka dot.
  • Print the polka dots wherever you want, without any particular pattern.
  • Do the same for all the nails.
  • Take off the excess nail polish with the brush itself, if necessary.
  • Wait a few minutes for the polka dots to dry.
  • Now take the glitter nail polish with its brush and print smaller polka dots in the centre of the white polka dots.
  • Repeat the same for all the nails and let them dry.
  • Finish with a transparent top coat. Enjoy!!

Saturday, 7 December 2013

Black and white polka dots nail art


Hi Girls!!! Today I have come up with a beautiful yet pretty easy nail art using all time hit color combo black and white!! :)

You can see how pretty it looks!!! :) 

Wanna get this nail art for your weekend holidays? Well here are some simple steps, just follow them and let the compliments come along! :)

You will need:


  • Base coat
  • Black color Nail polish ( I have used MUA)
  • White color Nail polish ( I have used Eyetex Dazzler)
  • Transparent Nail polish ( I have used Eyetex Dazzler)
  • A Toothpick
  • A striping tool or an old nail polish brush which is trimmed at its edges.

Step One:


  • Firstly, paint your nails with a base coat to protect them.
  • Wait till the base coat dries and now paint your nails with white and black nail colors alternatively as shown.

Step Two:


  • Wait till the nail colors dry.
  • Now, take white nail color with the nail polish brush and drop some color on a paper. 
  • Now dip the back of the toothpick in the white color and print it on the black base coat of the thumb.
  • Print the dots right at the centre of the nail, to form an arc shape or a 'C' shape, and fill in the left side of the nail with dots.
  • Repeat the same method,(but reverse the 'C' shape for alternate fingers, as shown in the picture) with all the nails except the middle finger.  
  • I have given the middle finger nail a different design. Print 3 or 4 white dots only at the edge of the nail. 
  • Now take the striping tool or an old nail polish brush (with thin edge) and fill in (remember! only at the edges as shown in the picture) with small dots. You can use even an old eyeliner brush for this.
  • Now enjoy your mani! :)


Friday, 6 December 2013

Heavy brass metal bangle


Adorable bangle made of brass metal, coated with black color and has a cut in design. Looks best with any western outfit, chudidhars and even saris.

Thursday, 5 December 2013

Metal black long chain


Amazing long chain in black, having multiple strings attached together. Each string has small silver color crystal beads. Looks stylish when worn on western outfits.

Pumpkin curry


Hello girls!! You know what my mom prepared for lunch today?? You can see in the picture above. Yes, Pumpkin curry! It tastes as yummy as it looks!! :) It has got many notes, hot, spicy and sweet. The flavor of jaggery stands out and makes this dish tastier and special. It is very easy to prepare this dish. Just try it out! :)

Preparation Time: 15 min
Cooking Time : 40 min
Serves 4

Ingredients:

Small Pumpkin cut into medium sized pieces (Approx 500 gm) - 1

Oil - 1 cup

Mustard seeds - 1/2 Teaspoon

Cumin - 1/2 Teaspoon

Fenugreek seeds - 5 to 6

Garlic crushed - 5 to 6 cloves

Red chillies (whole) - 2

Green chillies (slightly slit) - 2

Tamarind pulp - 1/4th cup

Jaggery (grated) - 2 Tablespoons

Medium sized Onions (chopped) - 3

Red chilli powder - 2 Tablespoons

Curry leaves - 10 to 12

Salt - To taste

Coriander (chopped) for garnishing - 1/4th cup

Method:
  • Heat oil in a deep pan and add cumin, fenugreek, mustard seeds, garlic, onions, curry leaves, green and red chillies. 
  • Saute till the onions become golden brown. 
  • Now add pumpkin pieces. Mix well and saute for 1-2 min. 
  • Add water till the pumpkin pieces get drowned. 
  • Now cover the pan and let it boil for 10-15 min on low flame. 
  • Check a piece of pumpkin. If it is soft and cooked, add tamarind pulp and jaggery. 
  • Let the gravy get thick and wait till the oil leaves the edges. 
  • Garnish with chopped coriander and serve hot with steamed rice or rotis.

Wednesday, 4 December 2013

Lakme Eyeconic kajal - Review

Hiya girls!!!

Countdown started for Christmas!! Just 20 days to go!!! I am super excited!! :)

So, my dear girls, what are your plans for Christmas? Me and my sissy started concentrating on our beauty and becoming more and more beauty-conscious day by day as the Christmas day is approaching, to look best on the festival day!! :)

We are also trying on new products for the make up, and then we came across this- Lakme Eyeconic Kajal!
Its a lovely lovely product, I can say!!
I couldn't stop myself to give a review about my new sweet heart! :)

So, here is how it looks! Very classy, isn't it? :)


I have been using this from the last two months, and it has become one of my must-haves in my make up bag!

Lakme Eyeconic kajal boasts the following features:

  • Waterproof
  • No smudge
  • 10 Hour stay
  • Dermatologically tested
Waterproof:

I can give 10 on 10 to this attribute. It doesn't  fade with splashes of water. It sometimes doesn't fade completely even after taking a bath. You should certainly use a good make up remover to completely remove it.

My rating: 4.5/5

No Smudge:

Yes. Eyeconic wins even in this attribute. It is sure to be intact even after a nap! Mine are a bit oily eyes, so I can see some traces of smudge at the end of the day. It varies from person to person. Most of the reviews I have seen gives full marks in this context.

My rating: 5/5

10 Hour stay:

This claim is correct to some extent. It stays 10 hours or even I can say more than that, but not perfectly. You need to touch up after 3-4 hours. But it does not fade away completely, leaving your eyes bare. 

My rating:4/5


Dermatologically tested:

This claim proves to be true because, it did not cause any irritation or infection or made my eyes reddish or watery. I can wear it very comfortably for many hours. No complaints till now.

My rating:5/5

Here are some more aspects, I want to review:

Looks and design:


It looks very sleek and stylish in its design. So, it can be easily carried wherever we go. It has an easy twist-up format, which can be used very conveniently.

My rating:5/5

Color:


It boasts an absolute deep black shade, and is sure to give your eyes a perfect eyeconic look! 
In the image above, the first line shows single stroke of the kajal, the second line shows double strokes. But the thing is, it needs two or three strokes on the waterline, to make it look more prominent.

My rating: 5/5

Price:

199 INR. 
 I think the price is reasonable, as it is worth the price!

My rating: 5/5

Other details of the product:

Net Weight: 0.35g

Shelf Life: 30 months from packed date


All in all, Lakme eyeconic kajal is very comfortable to wear all day long. Its really very long lasting without any smudge. You can even wear it as an eyeliner on the upper lid, if you want a thicker and bold line. It is very creamy and glides very well. The jet black color of the kajal gives your eyes a striking and prominent look. Even if you use it everyday, it easily lasts for 5-6 months. So, its really worth the price.


Pros:

  • Waterproof
  • No smudge
  • Long-lasting
  • Dermatologically tested, so safe for eyes
  • Smooth application
  • It is very dark black in color.
  • Can be used even on the upper lids
  • Decently priced
  • Convenient twist format
Cons:
  • Doesn't last perfectly for 10 hours.
  • Should be given two or three strokes to get the perfect shade.
Total Rating I can give to Lakme eyeconic kajal: 4.8

It is highly recommended and I'll surely get a new one even before I finish it! :)


Tuesday, 3 December 2013

Black crystals two strings long necklace


Fabulous long chain having two satin strings (one shorter and the other longer) with black crystals. Gives you absolutely trendy look and looks best when paired up with any western outfit.

DIY Sequins Camisole

Hello Girls!!! :)

Entered into the first week of December! Hope you all are done with your Christmas shopping! Feeling very excited for the Christmas day!! :) 

Today I want to share a simple DIY of a camisole.

If you are bored of wearing normal simple camisoles, you can just add some flair to it by embellishing it with sequins. So here is the simple DIY idea I want to share with you guys!! Hope you enjoy!! :)
All you need are:

  • A Thread(same color of the cami)
  • A Needle
  • Sequins


I have embellished the straps and neckline of the cami. It can easily be done with some sequins using a basic chain stitch. I have used orange colored sequins. The embellishing adds a brand new look even to your old camisole, and all this can be done very easily, in no time.

The sequins embellished using a basic chain stitch


This is my simple idea. You can do this in your own different ways! So, be creative and be ready to get complements!! :)


Monday, 2 December 2013

Funky Wooden Long chain

Very funky and colorful long chain made with wooden beads. Definitely adds color to any western outfit. Perfect and must have accessory for a holiday on the beach!

Friday, 29 November 2013

Colorful Thread bangles


Colorful  bangles wound up with silk thread! These bangles are really light weight, because they are made from light weight plastic bangles. These bangles goes really well with any outfit, believe me! They look outstanding on kurtis, saris, chudidhars and even on any western outfits!

Thursday, 21 November 2013

Patch work Nail art


Hiya Girls!!!!

Hope you are ready for the weekend! Today I want to show you a simple patch work nail art tutorial. Its really very simple and easy. You can do it with free hand! Have a blast on this weekend with this beautiful nail art!

First of all, we'll see what we will need..


You will need:


  • Base coat
  • White nail polish
  • Top coat
  • Any three colors of your choice
  • A striping nail art brush or an old nail polish brush which is trimmed at its edges.


Step One:


  • Firstly, paint your nails with a base coat to protect them.
  • Wait till the base coat dries and now paint your nails with white nail polish. We use the white nail polish so that the colors we use for the mani, pop and really look good.


Step Two:


  • Wait a while till the white nail color coat dries.
  • Now, Paint the thumb with one color (I used pink here).
  • Paint the index finger with the other color (I used green).
  • Paint the middle finger with the third color (I used yellow).
  • Now repeat with first and second colors for the remaining two fingers.


Step Three:


  • Wait until the colors dry.
  • Now take a color and paint a part of nail with it. You can see how I have painted in the image below.
  • Do the same for the remaining nails. Make sure you use the colors alternatively.
  • Let them dry for a couple of minutes.


Step Four:


  • Now once you make sure that the paints are dry, paint the nails with the remaining color as shown.
  • Be little careful, and you can easily do this with free hand.
  • Let them dry.


Step Five:


  • Now, outline the patches with black color using a striping tool. If you don't have one, no worries, use an old nail polish brush with its bristles trimmed off, making them thin.
  • Outline slowly and carefully.


Step Six:


  • Now, create stitch like patterns on the black outlines. Be careful and draw as many as you want, with the striping brush slowly.
  • Let the stitches dry and finish off the nail art with the top coat!
  • Ta da! You are done with the mani!
  • Enjoy!!!


Monday, 18 November 2013

Simple pink crystal drop necklace earrings set

Simple yet elegant necklace with a black string having pink drop shaped crystals separated by small white color beads. They have got matching earrings with a single pink crystal hanging. Necklace is short length and looks great when paired up with any dress!

Monday, 11 November 2013

Silver White stones anklets

Beautiful silver designer anklets with glittery white stones! They have simple design, but looks adorable on your legs. Believe me! :)

Purple color crystals necklace earrings set

Dazzling Purple colored big sized crystals necklace paired up with matching earrings. Has small crystals alternatively. Definitely looks outstanding when worn. Can be worn with western outfits and even with saris. 

Sandstone pendant chain

Lovely 22 carat short length gold chain with heart shaped sandstone pendant.

Floral gold bracelet

Pretty 22 carat gold bracelet with floral design and small mangoes. Can be used as daily wear and even for small parties.

Saturday, 9 November 2013

Little hearts nail art


Yet another beautiful nail art with colorful hearts!! Anyone can do this very easily.

You will need:

  • A white color nail polish
  • 6 or 7 different colored nail polishes
  • A transparent nail polish
  • An old nail polish brush
How to do:
  1. First, apply the base coat with white color. Let it dry.
  2. Apply one or two coats of transparent nail color on the base coat.
  3. Now take a color and paint hearts on the base coat. You can do this with an old nail polish brush, which is trimmed in the edges to get fine lines. Easiest method to get hearts is to draw 'V' and adjust it to get perfect heart shape. 
  4. Repeat the same with all the colors.
  5. Finish off with the transparent nail color. That's it! Your beautiful hearts nail art is done!

Friday, 8 November 2013

Lady bug nail art


Did you ever see an adorable little beetle with perfect black spots on its bright red body? If not, you have probably missed a little wonder of God's creation, a Lady bug!
It is truly a lovely colorful creature, and here is how to get these cutesy beings on your nails.

You will need:


  • Bright Red nail polish ( I used NYC 226B Madison Avenue) 
  • Black Nail polish (I used MUA)
  • Transparent nail polish
  • White nail pen
  • An old nail polish brush
How to do:


  1. First paint the nails with the base coat of red color. Let it dry for a few minutes. Apply two coats of transparent nail polish. Let it dry.
  2. Take black color and paint the nails at the tips as half moons as shown above.Let them dry.
  3. Take a nail art striper, if you have, or I have used an old nail polish brush and cut its tip narrower, so that I get thin lines when I paint with it. Now draw thin lines through the middle of the nail with black nail color as shown.
  4. Now put a dot with black nail color just above the half moon on the line.
  5. Put black dots on either side of the black line, I have put just three dots on each side.
  6. Make sure the black half moons dry and put two white dots on the half moons, (that should be the Lady bug's eyes) to complete the look and ta-da! lovely lady bugs crawling right on your nails!
  7. Don't forget to finish the nail art with the transparent nail color coat. 


Wednesday, 6 November 2013

Blue stones bracelet

Here is another impressive bracelet, which goes perfect for any occasion. Made in antique finished brass metal and dazzled with blue and gold color stones.

Pearls three strings necklace

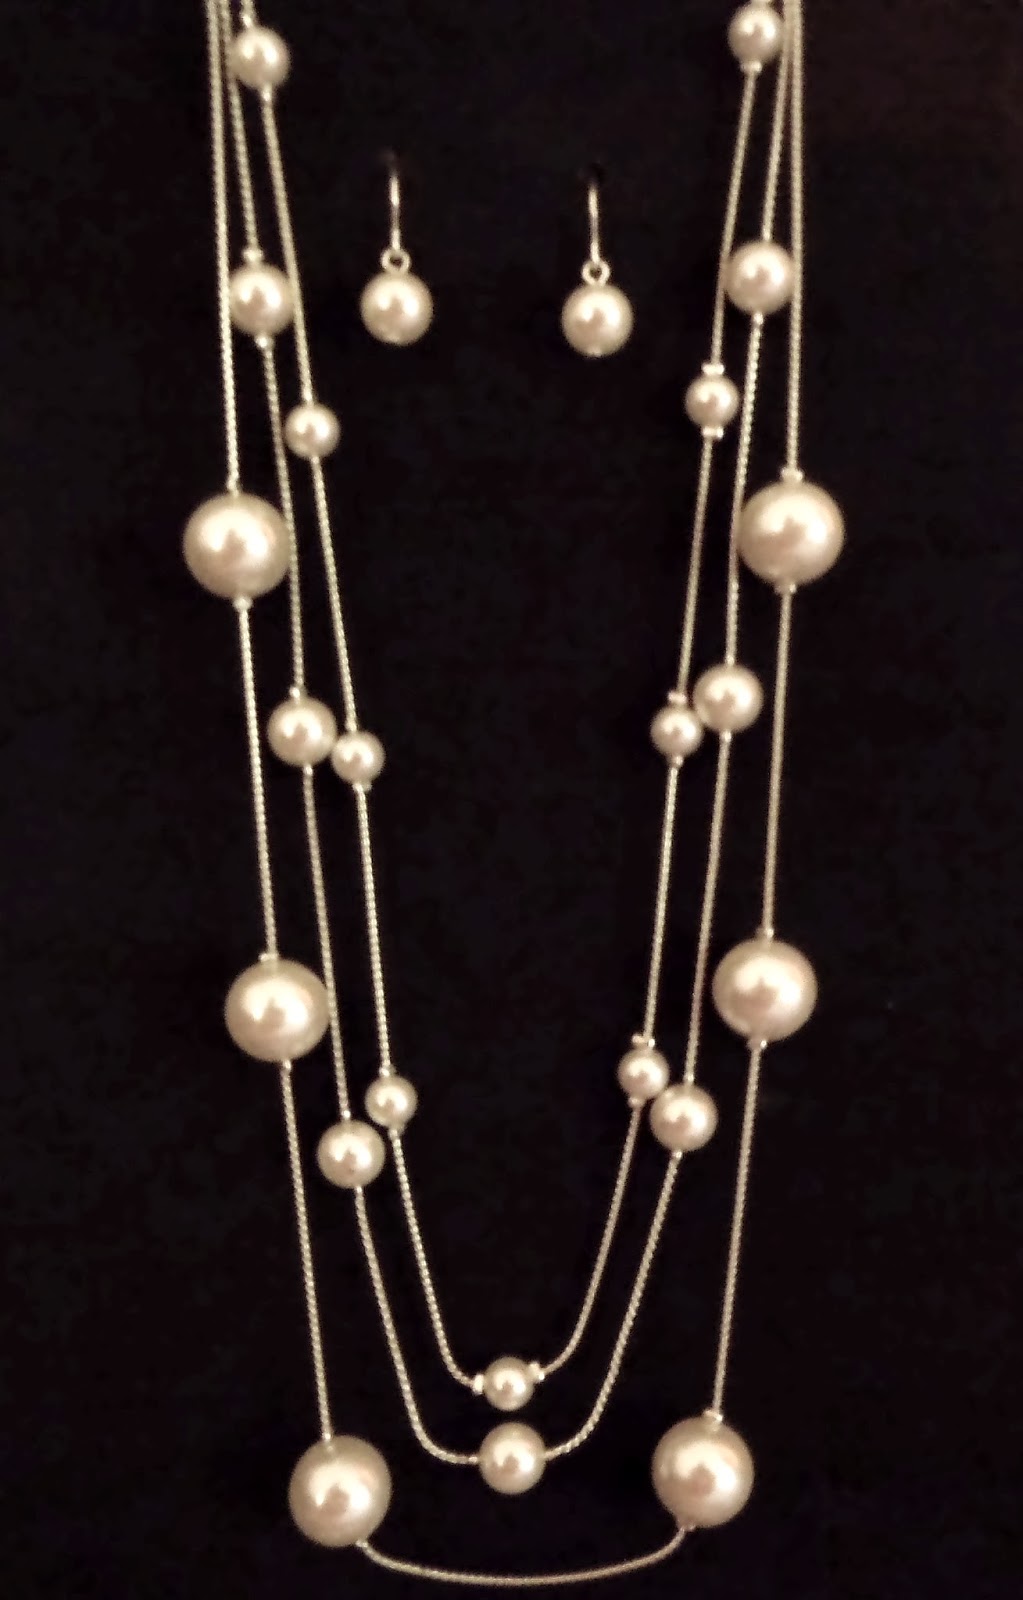
Beautiful Croft & Barrow's three strings pearls necklace, bought from Kohls. Small pearl drop earrings complements well with the necklace. Different sized  off white pearls make it look more classy.

Related Posts Plugin for WordPress, Blogger...